The Final Race!
Table of Contents:
- 1. Deadline
- 2. Problem Statement
- 3. Environment
- 4. Attempt Termination
- 5. Scoring Criterion
- 6. D-Day of the Competition
- 7. Implementation
- 8. Submission Guidelines
- 9. Allowed and Disallowed functions
- 10. Collaboration Policy
1. Deadline
11:59:59 PM, Dec 15, 2023. Live Race on the same day that is open to public. Teams will go in the order of their team number.
YOU ARE NOT ALLOWED TO USE ANY LATE DAYS FOR THIS PROJECT!
2. Problem Statement
Congratulations for making this far into the course. We know that you’ve worked very hard to get here and learned a lot of new concepts along the way. Now, it’s time to put everything together. The aim of this project is to win the race on an obstacle course which utilizes all the algorithms you built from projects 1 through 4.
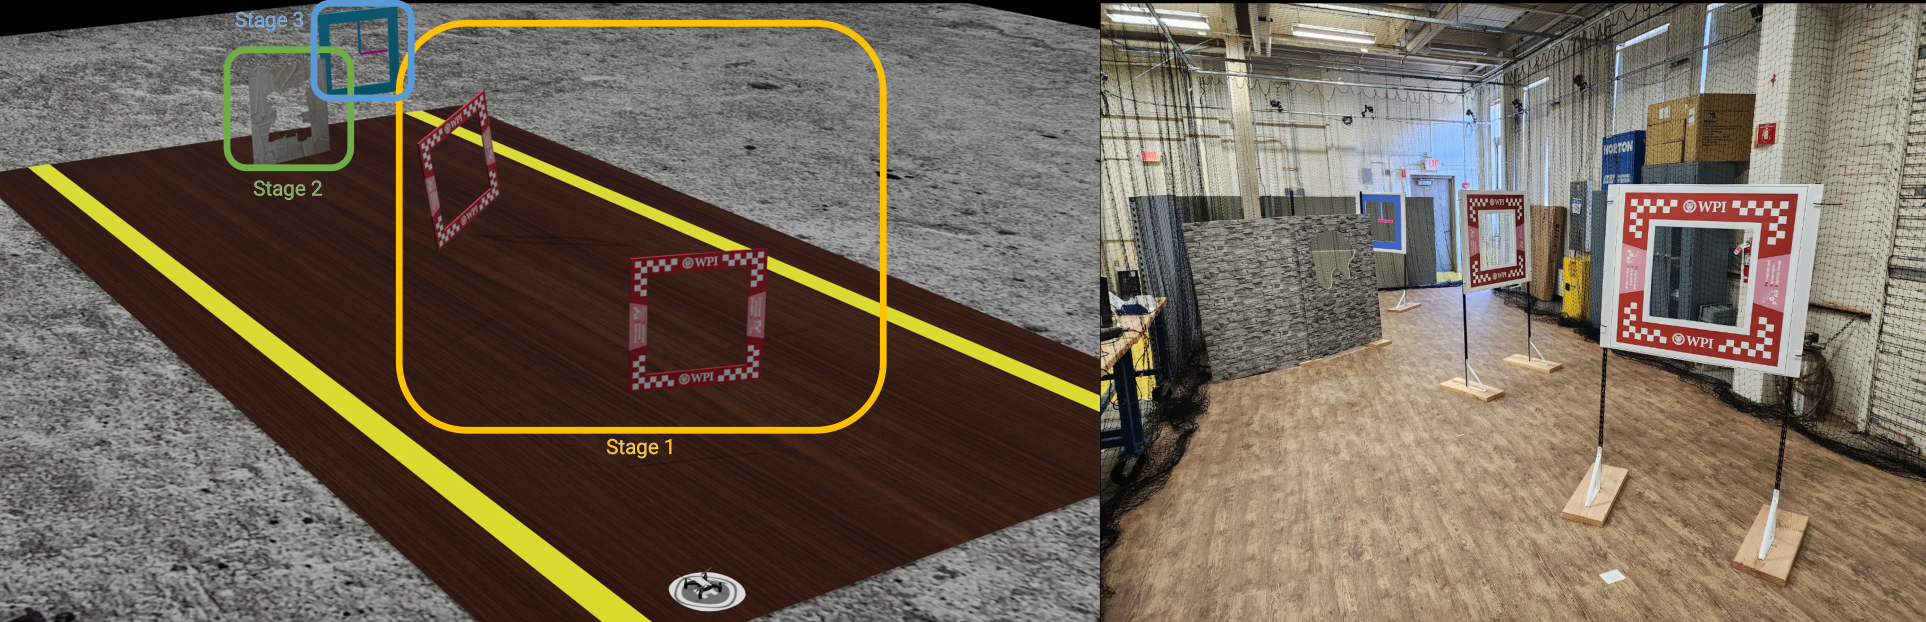
Remember that your DJI Tello Edu comes with a suite of sensors, a front facing RGB color camera, a down facing grayscale camera, an IMU along with the altimeter on-board. You can obtain the camera feed (only one camera works at a time), attitude estimates and altimeter measurements from the DJITelloPy package. You are ALLOWED to use any package to access any other information on the quadrotor. You can use any/all of the sensors to complete the course as quickly as you can. Also, the structure of the track (obstacle course) is known before along with a prior on pose of the obstacles as a uniform distribution, similar to previous projects. An oblique overview of the simulation and real track is shown in Fig. 1 with the various stages marked.
3. Environment
The final track has three stages. Description of each stage is given next. In this project, you are allowed to measure the approximate distances between parts of the course 2 hours before the final demonstration (no one is allowed one hour before the final demonstration, so essentially everyone gets one hour on the track together). However, after this, the instructors will nudge each obstacle (not changing the order) by upto 0.5m in either direction (X, Y and Z) and angles by upto 20 degrees in all directions. A blender environment of the track can be downloaded from here.
3.1. Racing Windows
In the first stage (see Fig. 1), you will take off from the helipad/origin and you have to navigate though a set of two drone racing windows from project 3 as fast as possible without any collisions. The description of the windows are the same as in project 3.
3.2. Unknown Window
In the second stage (see Fig. 1), you have to navigate though an unknown shaped window from project 4 as fast as possible without any collisions. The description of the window is the same as in project 4.
3.3. Dynamic Window
In the third/penultimate stage (see Fig. 1), you have to navigate though an “cyan” square window with a pink clock like hand rotating in the middle (See Fig. 2). The rotation speed of the hand is fixed but is unknown. You have to fly through this dynamic window as fast as possible without any collisions. The dimensions of the window are known apriori and you are free to measure them.
Once you pass through the dynamic window or the attempt is terminated (see next section), your run is complete and your time is recorded.
4. Attempt Termination
Doing any of the following will instantly terminate your attempt:
- Hitting the nets or crossing the extents of the boundary.
- Flying over a height of 2.5 m.
- Failing to navigate in any of the previous stages before proceeding to the next one.
- Crashing into any of the obstacles/track objects and/or the nets.
- Landing due to battery failsafe.
- Going over the maximum time of 5 mins per attempt.
5. Scoring Criterion
Taking off from the helipad gives the team 10 points, then the stages 1 through 3 (finish) have the following point splits: 30, 25, 35 totaling a maximum of 100 points for each attempt. The team’s attempt will be terminated if any of the things mentioned in Section 4 happen. If the number of stages between two teams are tied, then the team with the lower time comes out on top.
6. D-Day of the Competition
On the day of the competition, the teams will go in the order of their team number. Each team will have a maximum time of 5 minutes per attempt and a maximum time of 25 minutes for all attempts combined. Between attempts, the team can use any amount of time (within the allotted 25 minutes of maximum time) to fix any software/hardware bugs or do changes in hardware/software (including change of batteries). Only the best trial will be graded. All the teams need to be present for the entirety of the competition and the teams will go in the order of their team number unless they have requested a different order before.
A sample photo of the real track is shown in Fig. 1.
The competition will be from 10:00 AM to 1:00 PM. The lab will be setup close to the final track (only minor nudges will be made after) with the lighting conditions and so on at 7:30 AM on the day of the competition. You can go and measure anything you want, collect any data you desire and check the track until 9:30 AM on the day of the competition. From 9:30AM to 10:00 AM nobody will be allowed near the arena and the instructors will displace each obstacle randomly with a maximum disturbance of \(\pm\)0.5m in X and Y directions and \(\pm\)20 degrees in Yaw (just enough that hard-coding will not work).
The team with the highest points will win. Note that, completing the course (within the 5 minute slot per attempt) will get that team the maximum of 100 points.
The teams can place the quadrotor on the helipad in any desired orientation. Also, if a team wants to improve their live-demo score, they can request for an additional slot after all the teams have finished their demo with a penalty of 20 points of the total project 5 grade.
7. Implementation
This project is totally open ended! You can use any open-source code available online to solve any part of the problem. Make sure you CITE them. You are expected to use the implementations from the previous four projects but are NOT limited to it. You are NOT allowed to modify the DJI Tello Edu or the NVIDIA Jetson Orin Nano platform. This includes adding/subtracting any sensors. All your codes MUST run on the NVIDIA Jetson Orin Nano without any cloud computation. Your results are ONLY limited by your imagination and creativity!
8. Submission Guidelines
If your submission does not comply with the following guidelines, you’ll be given ZERO credit.
8.1. File tree and naming
Your submission on ELMS/Canvas must be a zip file, following the naming convention YourDirectoryID_p5.zip. If you email ID is abc@wpi.edu, then your DirectoryID is abc.For our example, the submission file should be named abc_p5.zip. The file must have the following directory structure. The file to run for your project should be called YourDirectoryID_p5/Code/Wrapper.py. You can have any helper functions in sub-folders as you wish, be sure to index them using relative paths and if you have command line arguments for your Wrapper codes, make sure to have default values too. Please provide detailed instructions on how to run your code in README.md file.
NOTE: Please DO NOT include data in your submission. Furthermore, the size of your submission file should NOT exceed more than 500MB.
The file tree of your submission SHOULD resemble this:
YourDirectoryID_p5.zip
├── Code
|   ├── Wrapper.py
|   └── Any subfolders you want along with files
├── Report.pdf
├── Video.mp4
└── README.md
8.2. Report
For each section of the project, explain briefly what you did, and describe any interesting problems you encountered and/or solutions you implemented. You must include the following details in your writeup:
- Your report MUST be typeset in LaTeX in the IEEE Tran format provided to you in the
Draftfolder and should of a conference quality paper. Feel free to use any online tool to edit such as Overleaf or install LaTeX on your local machine. - Link to a ghosted photo?
8.3. Video
Record your successful run in .mp4 format during your demo or before and submit it in the zip file. Make sure to name it as Video.mp4. Record the video in the highest resolution and fastest fps possible on your recording device with minimum being 1080p at 30fps. Record the video horizontally and such that the nets do not cover the frame. Use a super steady hand or a tripod for good quality shots.
9. Allowed and Disallowed functions
Allowed:
- Any code in the world that runs on-board the Orin Nano
Disallowed:
- Other student’s code in class
If you have any doubts regarding allowed and disallowed functions, please drop a public post on Piazza.
10. Collaboration Policy
NOTE: You are STRONGLY encouraged to discuss the ideas with your peers. Treat the class as a big group/family and enjoy the learning experience.
However, the code should be your own, and should be the result of you exercising your own understanding of it. If you reference anyone else’s code in writing your project, you must properly cite it in your code (in comments) and your writeup. For the full honor code refer to the RBE595-F02-ST Fall 2023 website.