Fly through boxes!
Table of Contents:
- 1. Deadline
- 2. Problem Statement
- 3. Environment
- 4. Implementation
- 5. Submission Guidelines
- 6. Allowed and Disallowed functions
- 7. Collaboration Policy
- 8. Acknowledgements
1. Deadline
11:59:59 PM, Oct 09, 2026.
2. Problem Statement
In this project, you will implement the navigation (planning and control) stack from Project 2a on a Crazyflie flying inside a Gaussian-splat reconstruction of the Washburn flight volume. You will tune the loop in simulation against that scene and then fly the same code on the real drone under motion capture. The starter code can be downloaded from here. The map is inside map1_2b.txt and the start and goal locations are in task.json. The course documentation covers the setup, the simulator and flying the drone.
3. Environment
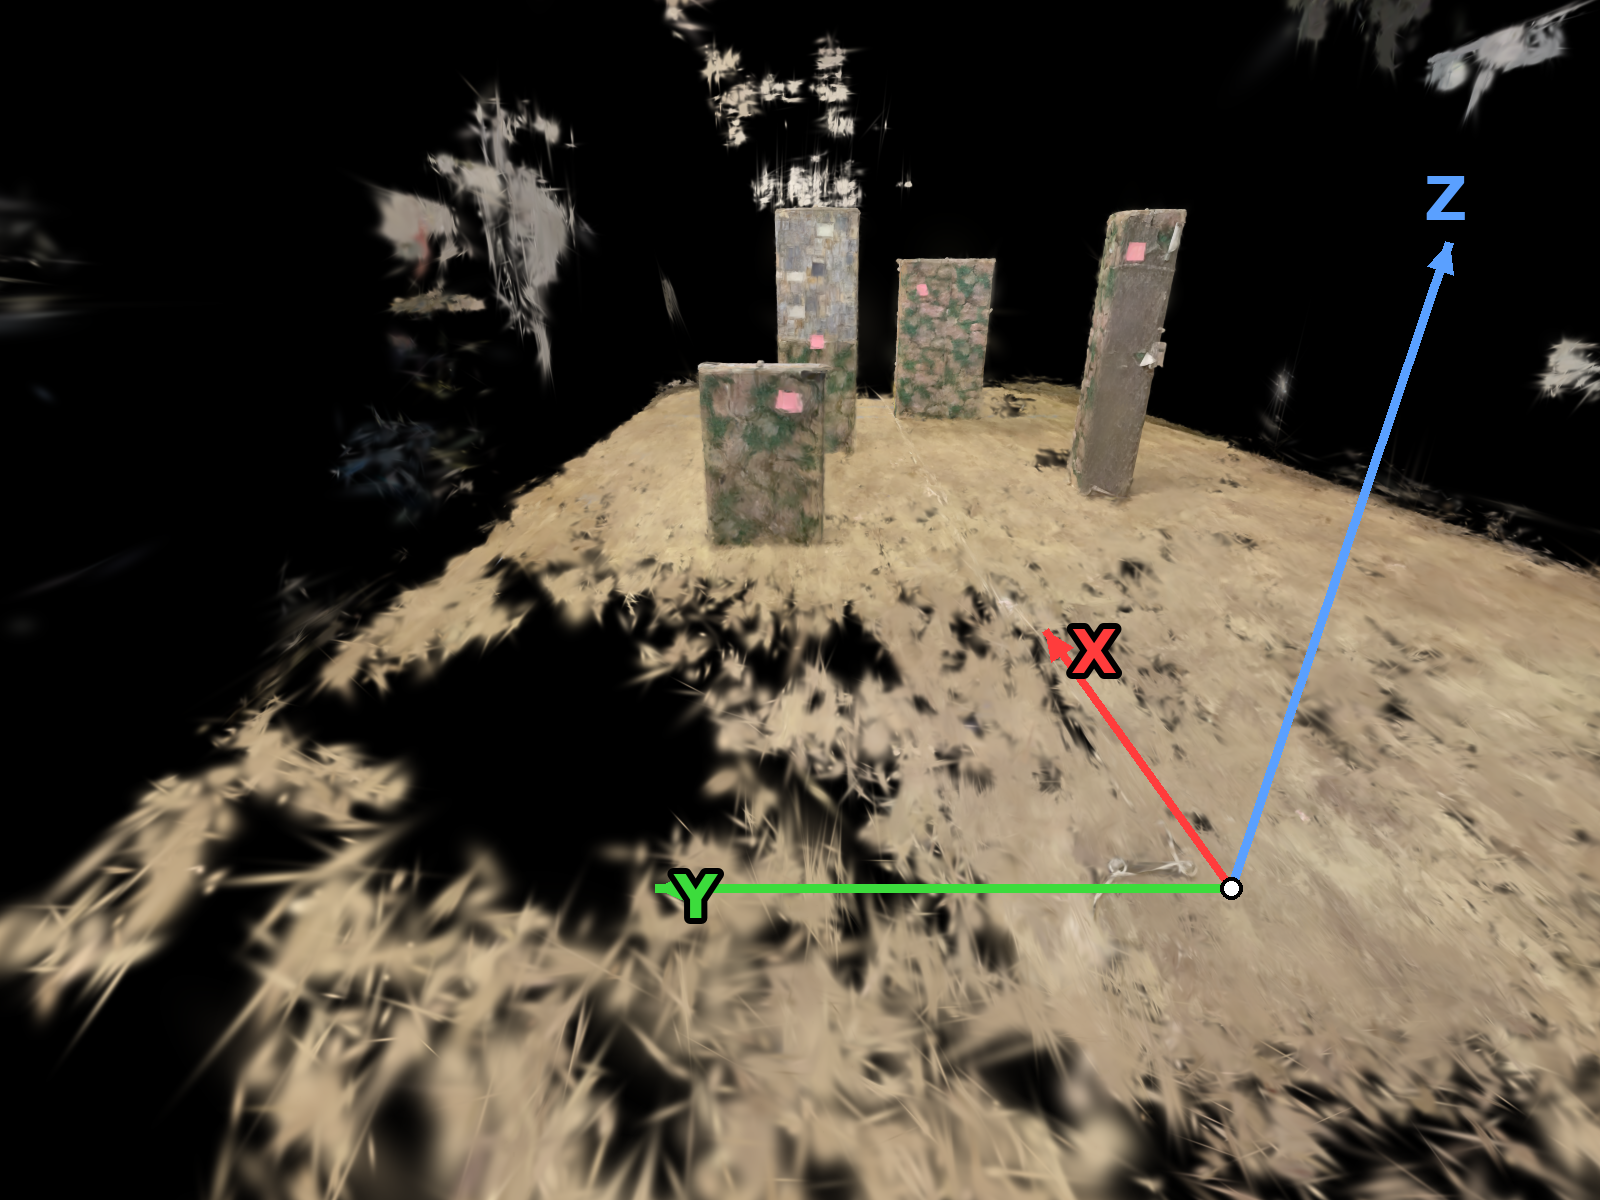
The map is known in advance, in the same file format as Project 2a, so the parser and the collision checks you wrote there work unchanged. The map for this experiment is map1_2b.txt in the starter code, and the environment it describes is shown in Fig. 1.
Everything is in metres, in the Vicon frame. The map, the start and goal pairs, and the pose the drone reports are all in that one frame — there is no separate scale factor for you to apply. Its origin and axis directions are shown in Fig. 1: x runs along the course, y across it, z up, with z = 0 at the floor.
The start and goal pairs are in task.json, each given as an (x, y, z) triple in metres.
The boundary line in map1_2b.txt is the flyable box, not the room. Its zmin is 0.30 m and no part of your plan may go below it. Its zmax is 1.80 m, and the obstacle heights in the file are the real ones – the tallest is 1.36 m – which leaves 0.44 m between that obstacle and the ceiling.
4. Implementation
You will be flying a Crazyflie inside the Gaussian-splat reconstruction of the flight volume. The goal is to navigate through a known map given the oracle position: the drone’s pose comes from the Vicon motion-capture system, so you may treat it as ground truth and spend your effort on planning and control rather than on state estimation. Essentially, you will be implementing a path planner, a waypoint trajectory generator and a position controller. To do this, you will modify your code from Project 2a and integrate it with the splat_hitl and cf_vicon_stack packages (more details on Turning setup are given in install.md file in the starter package and WPI’s Turning documentation can be found here).
Your controller is a position loop whose output is a velocity. The drone takes cmd_hover, which is a velocity command, and the Crazyflie closes the inner rate loop in its own firmware. Do not port the cascaded inner loop from Project 2a. That is nine gains to tune, not eighteen.
The goal is to navigate through the scene as fast as possible. Show your quadrotor pose in the map in matplotlib through the run.
A video tutorial on Turning access by the previous TA Deepak is shown below and can be downloaded from here.
4.1. Collision Handling
Your quadrotor should fly as fast as possible. However, a real quadrotor is not allowed to collide with anything (video). Therefore, we have zero tolerance towards collision - if you collide, you crash, you get zero for that test. Your run is also scored automatically, against the scene’s distance field: the monitor latches a failure the first time the drone’s centre comes within 0.10 m of reconstructed geometry, or leaves the mapped volume. It does not reset – there is one verdict per run.
As you program your controller you will find that it overshoots, and trajectory smoothing will pull the flown path off the planned one.
Inflate the obstacles. The map describes a point robot and exact boxes. You are flying a drone with a 75 mm radius, through a reconstruction in which the same box surface sits a few centimetres away from the number in the file. Remember the boundary as well as the blocks, because clipping a wall is also a crash. Start from about 100 mm of inflation. The amount used at test time may differ; use the number you are given then.
5. Submission Guidelines
If your submission does not comply with the following guidelines, you’ll be given ZERO credit.
5.1. File tree and naming
Your submission on ELMS/Canvas must be a zip file, following the naming convention p2b_GroupGROUPNUM.zip. Find your group number on Canvas. If your GROUPNUM is 1, then for our example the submission file should be named p2b_Group1.zip. The file must have the following directory structure. The file to run for your project should be called p2b_GroupGROUPNUM/Code/Wrapper.py. You can have any helper functions in sub-folders as you wish, be sure to index them using RELATIVE paths, never absolute ones – your code has to run on a machine that is not yours, and an absolute path from your laptop will not resolve on the grader’s. If you have command line arguments for your Wrapper codes, make sure to have default values too. Please provide detailed instructions on how to run your code in README.md file.
NOTE: Please DO NOT include data in your submission. Furthermore, the size of your submission file should NOT exceed more than 500MB.
The file tree of your submission SHOULD resemble this:
p2b_GroupGROUPNUM.zip
├── Code
|   ├── Wrapper.py
|   ├── path_planner.py
|   ├── trajectory_generator.py
|   ├── control.py
|   ├── environment.py
|   └── Any other helper modules you wrote
├── Report.pdf
├── RunVideo.mp4
├── VisVideo.mp4
├── VidTop.mp4          <- extra credit only
├── VidObl.mp4          <- extra credit only
└── README.md
Submit only what you wrote. Do not include the starter pack, the scene
(splat, ESDF, point cloud), map1_2b.txt, task.json, or any flight logs –
we already have them, and they will push you past the size limit. Your
Wrapper.py should take the path to the starter pack as a command line
argument with a sensible relative default, so it can be pointed at our copy.
5.2. Report
For each section of the project, explain briefly what you did, and describe any interesting problems you encountered and/or solutions you implemented. You must include the following details in your writeup:
- Your report MUST be typeset in LaTeX in the IEEE Tran format provided to you in the
Draftfolder and should of a conference quality paper. Feel free to use any online tool to edit such as Overleaf or install LaTeX on your local machine.
5.3. Video
Record your successful run in .mp4 format, during your demo or before it, and submit it in the zip file. Name it RunVideo.mp4.
Your matplotlib visualisation – the quadrotor pose in the map, with the obstacles, the planned path and the trajectory – should be a second video, named VisVideo.mp4.
5.4. Extra Credit
Implementing the extra credit can earn you bonus points. Generate a video of your RRT* in action, like the ones shown below: the tree expanding, the nodes being searched, and the final path and trajectory. Do this for your live run – the recorded Vicon poses – on the splat given to you. Attach both a top-down and an oblique view, named VidTop.mp4 and VidObl.mp4.
6. Allowed and Disallowed functions
Allowed:
- Any functions regarding reading, writing and displaying/plotting images in
cv2,matplotlib - Basic math utilities including convolution operations in
numpyandmath - Any functions for pretty plots and visualizations
- Any assets for visualizations
- Quaternion libraries
- Any library that perform transformation between various representations of attitude
- Any code for alignment of timestamps
Disallowed:
- All functions disallowed in P2a
If you have any doubts regarding allowed and disallowed functions, please drop a public post on Piazza.
7. Collaboration Policy
NOTE: You are STRONGLY encouraged to discuss the ideas with your peers. Treat the class as a big group/family and enjoy the learning experience.
However, the code should be your own, and should be the result of you exercising your own understanding of it. If you reference anyone else’s code in writing your project, you must properly cite it in your code (in comments) and your writeup. For the full honor code refer to the RBE595-F02-ST Fall 2026 website.
8. Acknowledgements
This fun project is inspired by ENAE788M: Hands-On Autonomous Aerial Robotics at the University of Maryland, College Park and MEAM620: Advanced Robotics at the University of Pennsylvania.