The Final Race!
Table of Contents:
- 1. Deadline
- 2. Problem Statement
- 3. Environment
- 4. Attempt Termination
- 5. Scoring Criterion
- 6. D-Day of the Competition
- 7. Implementation
- 8. Submission Guidelines
- 9. Allowed and Disallowed functions
- 10. Collaboration Policy
1. Deadline
11:59:59 PM, Dec 11, 2026.
YOU ARE NOT ALLOWED TO USE ANY LATE DAYS FOR THIS PROJECT!
2. Problem Statement
Congratulations for making this far into the course. We know that you’ve worked very hard to get here and learned a lot of new concepts along the way. Now, it’s time to put everything together. The aim of this project is to win a race through a course that combines the racing windows from Project 3 with the unknown shaped window from Project 4, using all the algorithms you built in Projects 1 through 4.
As in Projects 2b to 4, you will fly a Crazyflie in the net under motion capture, and its camera images are rendered from a Gaussian splat of the net at the drone’s pose. The layout of the course is known in advance, but the windows can be moved before the race, so you will need real perception to find them. You are free to use classical methods, reinforcement learning (RL), or a mix of both (see Section 7). The starter code can be downloaded from here. The course documentation covers the setup, the simulator and flying the drone.
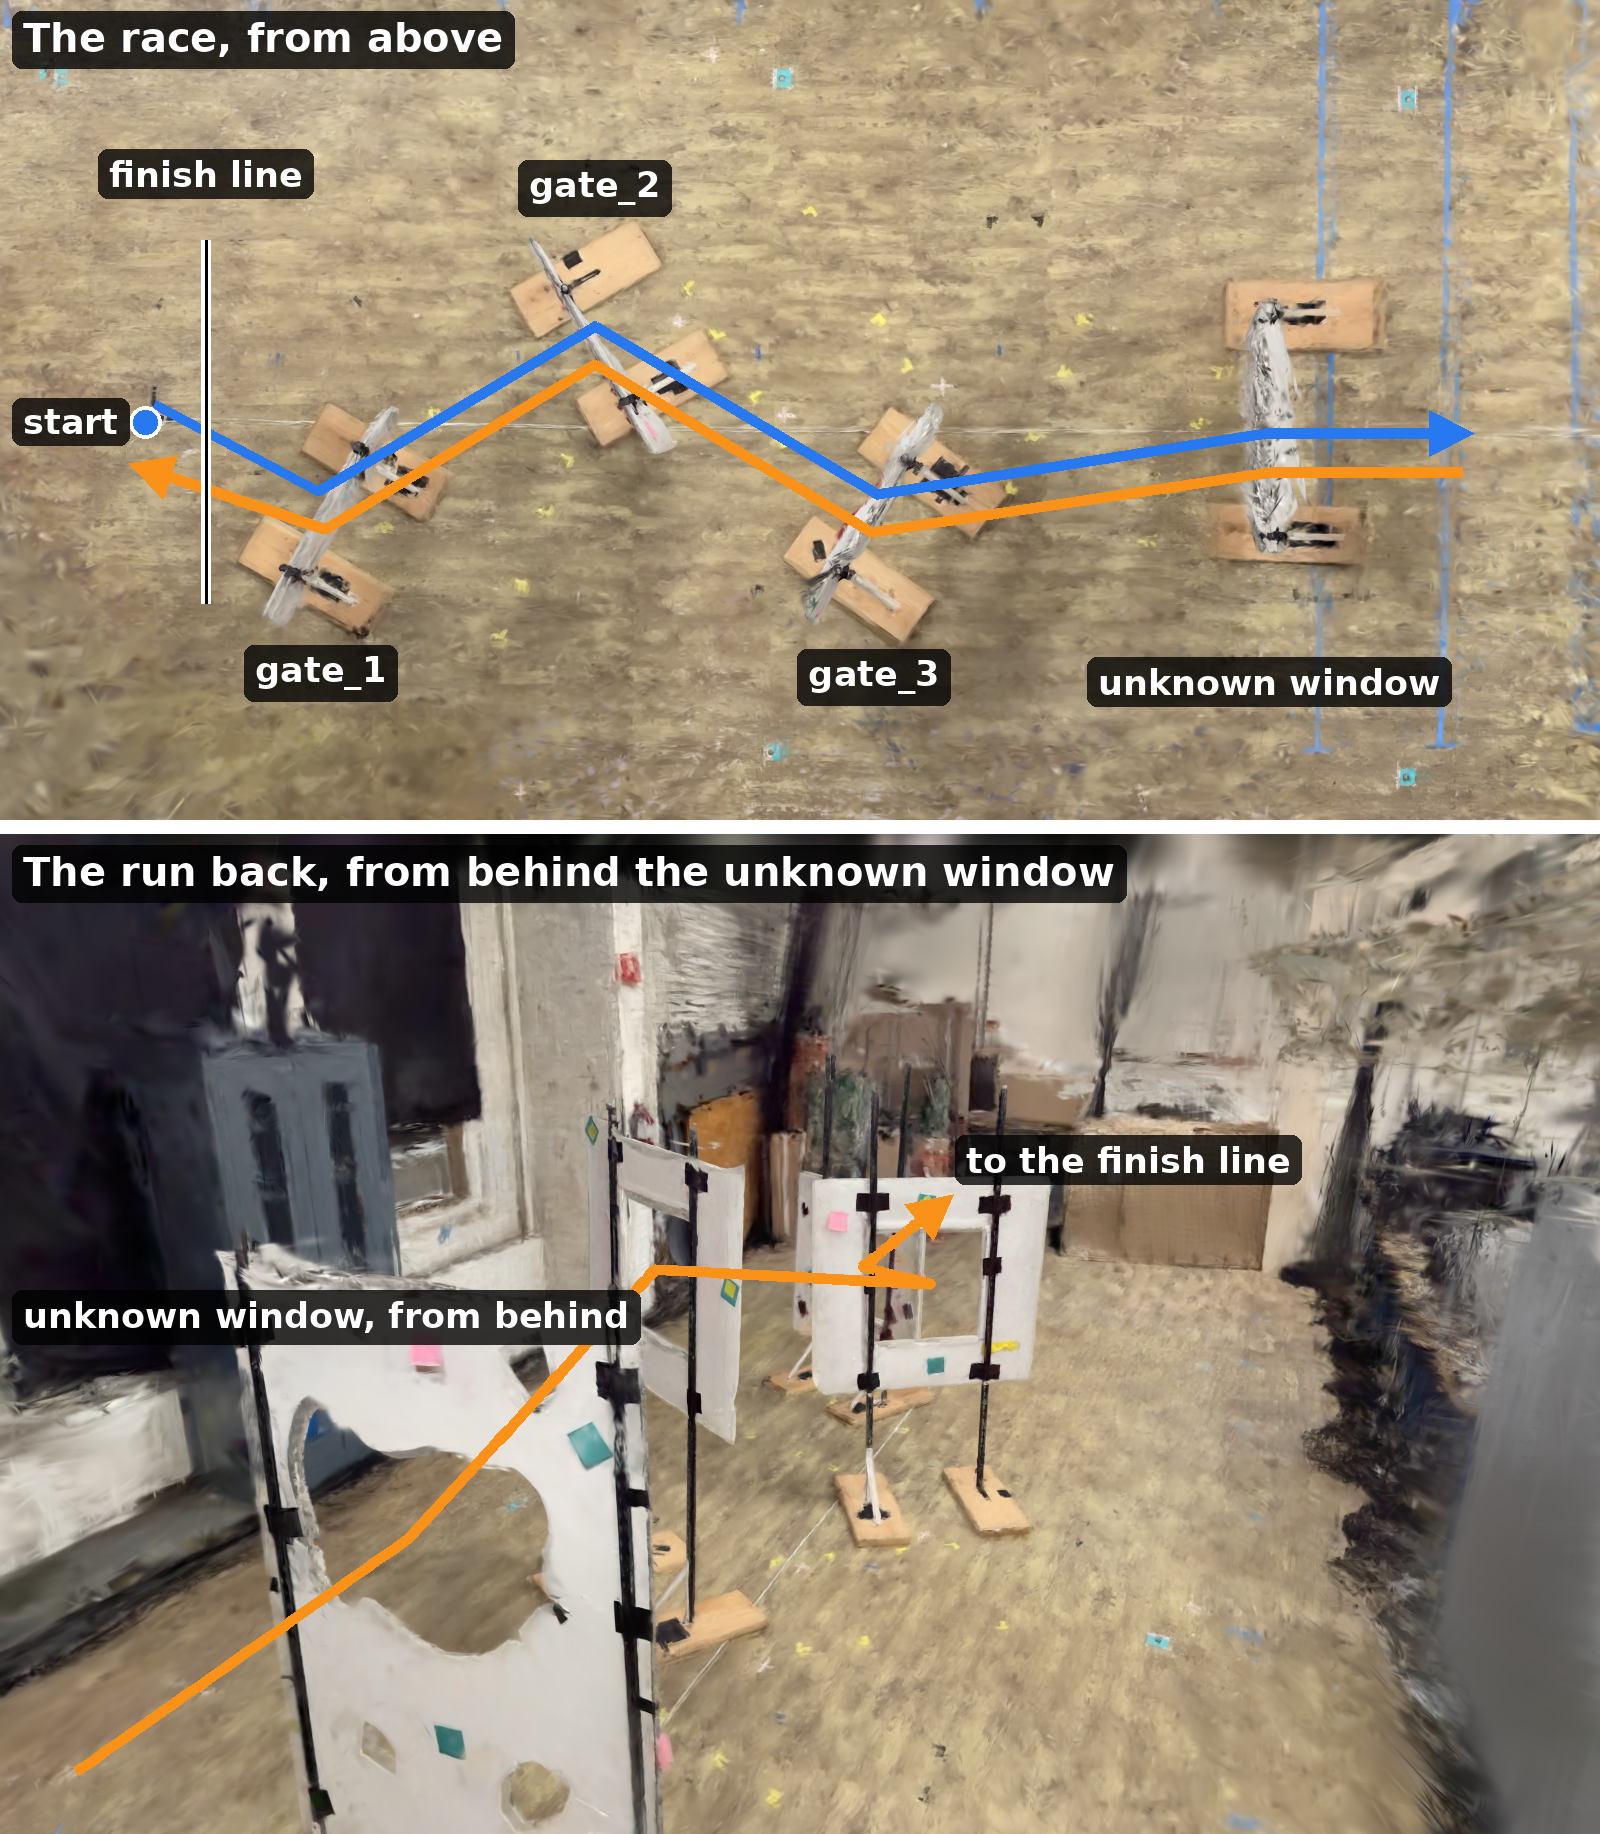
3. Environment
The final course has three stages, described next. The map of the course, with where each window stands, is in the training scene of the starter code, and its course_map.py reads it for you. On race day the windows will be moved from those positions and turned, and the unknown window’s hole can have another shape and place, enough that a drone flying the map blind will crash. Use the map as a prior: it tells you roughly where to look and which window comes next, but where each window actually is must come from your perception stack. Your flight code may read the training map, but not the window fields of the state your policy is given, or any of the race-day scene’s files.
Everything is in metres, in the Vicon frame, as in Projects 2b to 4, and the real windows stand in the net where they are in the race-day scene. The camera is the same front-facing RGB-D camera as in Projects 3 and 4: every frame is an RGB image and a depth image in metres, with a 60.66° horizontal field of view that you are not allowed to change. You choose the resolution, and to look somewhere else, you yaw the drone. The loop runs at 15 Hz on the lab PC: rendering, perception and control all share the 66 ms between frames.
3.1. Racing Windows
In the first stage, you will take off from the start and you have to navigate through the three drone racing windows from Project 3, in order, as fast as possible without any collisions. The description of the windows is the same as in Project 3.
3.2. Unknown Window
In the second stage, you have to navigate through an unknown shaped window from Project 4 as fast as possible without any collisions. The description of the window is the same as in Project 4: its panel has one hole the drone fits through and a few smaller ones it does not.
3.3. Run Back
In the final stage, you have to fly back through the same course to the start as fast as possible without collisions. Here, you have to first pass through the unknown window and then the racing windows in reverse order, each from behind, and then cross the finish line: the line across the course 0.25 m in front of the start, 1.5 m wide. Behind the unknown window there is more than a metre of free space to stop and turn round in, and from behind, all the windows are white boards with a few squares and sticky notes on them. Once you cross the finish line or your attempt is terminated (see next section), your run is complete and your time is recorded.
4. Attempt Termination
Doing any of the following will instantly terminate your attempt:
- Crashing into a window, its stand or the nets, in the real net or in the scene as the collision monitor sees it.
- Crossing the extents of the boundary.
- Failing to navigate in any of the previous stages before proceeding to the next one: a window only counts once every window before it has.
- Your loop falling behind the 15 Hz camera rate (the stack stops it).
- Running out of the 3 minutes of the attempt (
fly.pyends the run).
5. Scoring Criterion
Taking off from the start gives the team 10 points, then the stages 1 through 3 (finish) have the following point splits: 30, 25, 35 totaling a maximum of 100 points for each attempt. The team’s attempt will be terminated if any of the things mentioned in Section 4 happen. If the number of stages between two teams are tied, then the team with the lower time comes out on top. A stage counts once you have flown through all of its windows in order and, for stage 3, crossed the finish line. The starter’s Wrapper.py scores your simulated runs the same way.
6. D-Day of the Competition
On the day of the competition, the teams will fly in the net in the order of their team number. The race-day course is the training course with the windows moved, and as in Projects 2b to 4, you will do a dry run first and then fly the real drone. Each team will have a maximum time of 3 minutes per attempt to show the instructors their code in action (fly.py in the starter ends each run after 3 minutes) and a maximum time of 15 minutes for all attempts combined. Between attempts, the team can use any amount of time (within the allotted 15 minutes of maximum time) to fix any software bugs or do changes in software. Only the best trial will be graded. All the teams need to be present for the entirety of the competition and the teams will go in the order of their team number unless they have requested a different order before.
The team with the highest points will win. Note that, completing the course (within the 3 minute slot per attempt) will get that team the maximum of 100 points.
The teams can place the quadrotor at the start in any desired orientation, and choose the height it hovers at before their policy takes over (--hold-altitude-m). Also, if a team wants to improve their live-demo score, they can request for an additional slot after all the teams have finished their demo with a penalty of 20 points of the total project 5 grade.
7. Implementation
This project is totally open ended! You can use any open-source code available online to solve any part of the problem. Make sure you CITE them. You are expected to use the implementations from the previous four projects but are NOT limited to it. You can use classical methods, learning-based methods such as reinforcement learning, or a mix of both. You are NOT allowed to modify the simulator or the flight stack to obtain more information, such as the true poses of the windows. This includes adding/subtracting any sensors. All your codes MUST run on the lab PC, inside the course container, within the 15 Hz loop, without any cloud computation. Your results are ONLY limited by your imagination and creativity!
7.1. Classical Approach
A classical stack can reuse almost everything you have built. Your Project 3 detector finds the racing windows and your Project 4 method finds the gap in the unknown window. The map (course_map.py in the starter) tells you roughly where each window is and which one comes next, so you know where to look. On the run back your Project 3 detector has never seen the windows’ white backs, so plan what tells you where they are, for example the depth image together with the map. A state machine like the ones from Projects 3 and 4 (find the next window, line up, approach, fly through, look for the next one), or a planner from Project 2b that uses the map as a prior, generates the waypoints. The velocity loop from Project 2b flies them. Re-plan as your perception refines each window’s pose.
7.2. Reinforcement Learning: Tips for Sim2Real
RL policies have raced quadrotors faster than world-champion pilots [1] and faster than optimal control [2], but only once the policy trained in simulation works on the real drone. The tips below come from papers on similar problems, adapted to our stack.
1. Model the drone you actually command. Your policy does not command the motors: it sends a velocity and yaw-rate command at 15 Hz, and the Crazyflie’s firmware closes the inner loops. So the dynamics your simulator needs is the closed-loop response from command to motion, and the best way to get it is to measure it:
- With a TA present and within the limits they set, fly a series of step inputs on each axis (x, y and z velocity, and yaw rate) at several amplitudes and in both directions, starting from hover and staying well inside the net.
- Record the commands you sent and the Vicon pose. Filter and differentiate the Vicon positions to get the velocity.
- Fit a simple model per axis to the step responses. A gain, a time constant and a delay (a first-order system with dead time) is a good start. Check whether the response saturates for large commands and whether one axis disturbs another.
- Keep a few flights out of the fit, for example a random sequence of steps, and check that your model predicts them.
- If a simple model does not fit, learn one: a small network that maps a short history of commands and velocities to the next velocity, in the spirit of the actuator network of Hwangbo et al. [3].
- If you want a motor-level physics model instead, see [4] for the Crazyflie 2.0 and [5] for the Crazyflie Brushless.
2. Put the latency in your simulator. Measure how long it takes from sending a command to seeing the drone respond in Vicon, and add that delay to your simulator. Give the policy its last few actions as part of its observation, so it knows which commands are still taking effect.
3. Randomize around what you measured. Train over a range of gains, time constants, delays and noise levels around your identified values, not on a single fitted model. Randomizing the dynamics during training is what lets one policy fly several different real quadrotors [6, 7].
4. Close the remaining gap with real data. After your first real flights, compare what your simulator predicted with what Vicon measured, fit a model of the difference (a residual), add it to your simulator and fine-tune the policy. This is how Swift reached champion level: it modelled perception residuals with Gaussian processes and dynamics residuals with k-nearest-neighbour regression, fitted both from real flights, and fine-tuned the policy in the augmented simulator [1].
5. Train on what your perception will give you, not on ground truth. In flight, your policy sees the output of your detectors, with their noise, misses and false detections. Feed the policy a compact representation, for example the next window’s corners or centre and your gap estimate relative to the drone, instead of raw images: training on an abstraction of the sensor input narrows the gap between simulation and reality [8, 9]. In your training simulator you can compute this representation from the true window poses, but corrupt it the way your real detector does: measure your detector’s errors on renders of the training scene, then add matching noise, dropouts and delay during training. (Using the true poses inside your own training simulator is fine; your flight code may not read them.)
6. Randomize the course. The windows will be moved on race day, so a policy that memorizes the training course will crash. Train on many courses, with the windows moved and turned around their positions in the map, so the policy learns to fly to the windows it sees rather than to where they used to be.
7. Shape the reward. A common recipe for racing is to reward progress towards the centre of the next window, give a bonus for passing it, penalize crashes heavily, penalize large or jerky commands, and reward keeping the next window in the camera’s field of view. Swift’s reward combines progress with such a perception term [1]. Song et al. argue that RL beats optimal control because it can optimize a better objective, not because it optimizes the same objective better [2], so time spent on the reward is well spent.
8. Keep the action space honest. Train with the same command interface and limits as the real drone: a velocity and a yaw rate at 15 Hz, clipped to the speeds and accelerations you saw in your step tests. A policy that relies on commands the real stack cannot follow will not transfer.
9. Use a fast simulator. RL needs millions of steps. Because your model works at the level of velocity commands, a vectorized simulator you write yourself in NumPy, PyTorch or JAX can step thousands of drones in parallel. Eschmann et al. train a Crazyflie control policy in seconds on a laptop with a highly optimized simulator and curriculum learning [10]. For physics-level Crazyflie simulators, see Crazyflow [11] and gym-pybullet-drones [12].
10. Test before you fly, and fly slow first. Run your policy in the course simulator against the splat (your Wrapper.py) before you touch the real drone, from several start poses, and in your own simulator on many courses with the windows moved. On the real drone, start with a lower speed limit and raise it as your runs stay clean. Judge your policy by its success rate over many randomized courses and seeds, not by your best run.
11. You do not have to go end-to-end. RL can be one part of a classical stack: for example, let your classical perception and planner pick the next window and let an RL policy fly to it, or learn a correction on top of your velocity controller.
7.3. References
- E. Kaufmann, L. Bauersfeld, A. Loquercio, M. Müller, V. Koltun and D. Scaramuzza, “Champion-level drone racing using deep reinforcement learning,” Nature, 2023.
- Y. Song, A. Romero, M. Müller, V. Koltun and D. Scaramuzza, “Reaching the limit in autonomous racing: Optimal control versus reinforcement learning,” Science Robotics, 2023.
- J. Hwangbo, J. Lee, A. Dosovitskiy, D. Bellicoso, V. Tsounis, V. Koltun and M. Hutter, “Learning agile and dynamic motor skills for legged robots,” Science Robotics, 2019.
- J. Förster, “System Identification of the Crazyflie 2.0 Nano Quadrocopter,” thesis, ETH Zurich, 2015.
- A. Gräfe, C. Scherer, W. Hönig and S. Trimpe, “How to Model Your Crazyflie Brushless,” arXiv, 2026.
- A. Molchanov, T. Chen, W. Hönig, J. A. Preiss, N. Ayanian and G. S. Sukhatme, “Sim-to-(Multi)-Real: Transfer of Low-Level Robust Control Policies to Multiple Quadrotors,” IROS, 2019.
- R. Ferede, T. M. Blaha, E. Lucassen, C. De Wagter and G. C. H. E. de Croon, “One Net to Rule Them All: Domain Randomization in Quadcopter Racing Across Different Platforms,” ICRA, 2025.
- E. Kaufmann, A. Loquercio, R. Ranftl, M. Müller, V. Koltun and D. Scaramuzza, “Deep Drone Acrobatics,” RSS, 2020.
- A. Loquercio, E. Kaufmann, R. Ranftl, A. Dosovitskiy, V. Koltun and D. Scaramuzza, “Deep Drone Racing: From Simulation to Reality with Domain Randomization,” IEEE Transactions on Robotics, 2020.
- J. Eschmann, D. Albani and G. Loianno, “Learning to Fly in Seconds,” IEEE Robotics and Automation Letters, 2024.
- M. Schuck, M. P. Rath, Y. Hua, A. Goudar, S. Zhou and A. P. Schoellig, “Crazyflow: An Accurate, GPU-Accelerated, Differentiable Drone Simulator in JAX,” arXiv, 2026.
- J. Panerati, H. Zheng, S. Zhou, J. Xu, A. Prorok and A. P. Schoellig, “Learning to Fly—a Gym Environment with PyBullet Physics for Reinforcement Learning of Multi-agent Quadcopter Control,” IROS, 2021.
8. Submission Guidelines
If your submission does not comply with the following guidelines, you’ll be given ZERO credit.
8.1. File tree and naming
Your submission on ELMS/Canvas must be a zip file, following the naming convention p5_GroupGROUPNUM.zip. Find your group number on Canvas. If your GROUPNUM is 1, then for our example the submission file should be named p5_Group1.zip. The file must have the following directory structure. The file to run for your project should be called p5_GroupGROUPNUM/Code/Wrapper.py: it runs your stack in the simulator. On the drone, tools/fly.py from the starter (ros_node with 3-minute runs) flies your policy class; say which one in README.md. You can have any helper functions in sub-folders as you wish, be sure to index them using RELATIVE paths, never absolute ones – your code has to run on a machine that is not yours, and an absolute path from your laptop will not resolve on the grader’s. If you have command line arguments for your Wrapper codes, make sure to have default values too. Please provide detailed instructions on how to run your code in README.md file.
NOTE: Please DO NOT include data in your submission. Furthermore, the size of your submission file should NOT exceed more than 500MB.
The file tree of your submission SHOULD resemble this:
p5_GroupGROUPNUM.zip
├── Code
|   ├── Wrapper.py
|   ├── policy.py
|   ├── perception.py
|   ├── control.py
|   ├── weights/          <- only if your method needs them
|   ├── training/         <- your training code, if you used RL
|   └── Any other helper modules you wrote
├── Report.pdf
├── FPVVideo.mp4
├── RunVideo.mp4
└── README.md
Submit only what you wrote, plus the trained weights your code needs. Do not include the starter pack, the scene
(splat, ESDF, point cloud), your training data, your system identification flight logs, or any training checkpoints
other than the final ones – they will push you past the size limit. Your Wrapper.py should take the path to the
scene as a command line argument, with the starter’s scene as a sensible relative default, so it can be pointed at
the race-day scene.
8.2. Report
For each section of the project, explain briefly what you did, and describe any interesting problems you encountered and/or solutions you implemented. You must include the following details in your writeup:
- Your report MUST be typeset in LaTeX in the IEEE Tran format provided to you in the
Draftfolder and should of a conference quality paper. Feel free to use any online tool to edit such as Overleaf or install LaTeX on your local machine. - If you used RL: your system identification (the step responses and the model you fit to them), your training simulator, the policy’s observation, action and reward, and what you did to make the policy work on the real drone.
8.3. Video
Record the FPV video (the drone’s camera view, RGB and depth) of your best run in .mp4 format and submit it in the zip file. Make sure to name it as FPVVideo.mp4. This video should include the raw footage (RGB and depth) and your detections all stacked side by side. Use the maximum resolution possible here for the best quality.
Record the same run on the real drone in .mp4 format, during the race or before it, and name it RunVideo.mp4. Record the video in the highest resolution and fastest fps possible on your recording device with minimum being 1080p at 30fps.
9. Allowed and Disallowed functions
Allowed:
- Any code in the world
- Training on renders of the training scene, and on any synthetic data you make
- Reading the training map in your flight code (the starter’s
scenefolder, throughcourse_map.pyor directly)
Disallowed:
- Other student’s code in class
- Reading the window fields of the policy state, or any of the race-day scene’s files, in your flight code
If you have any doubts regarding allowed and disallowed functions, please drop a public post on Piazza.
10. Collaboration Policy
NOTE: You are STRONGLY encouraged to discuss the ideas with your peers. Treat the class as a big group/family and enjoy the learning experience.
However, the code should be your own, and should be the result of you exercising your own understanding of it. If you reference anyone else’s code in writing your project, you must properly cite it in your code (in comments) and your writeup. For the full honor code refer to the RBE595-F02-ST Fall 2026 website.